A Retainer Plan is billing agreement with a client for a monthly remuneration. This is commonly a monthly fee to cover an agreed scope of work for the client. It often entails a set of preferential rates negotiated with the client. This help topic describes how to setup a retainer plan so that it matches the billing agreement. Once setup the actual hours spent on work within the scope of the retainer plan can be compared with the budgeted hours.
Note: For detailed notes on Analysing Retainer Plans, refer to: Client Retainer Plan vs Actual Analysis Report Notes

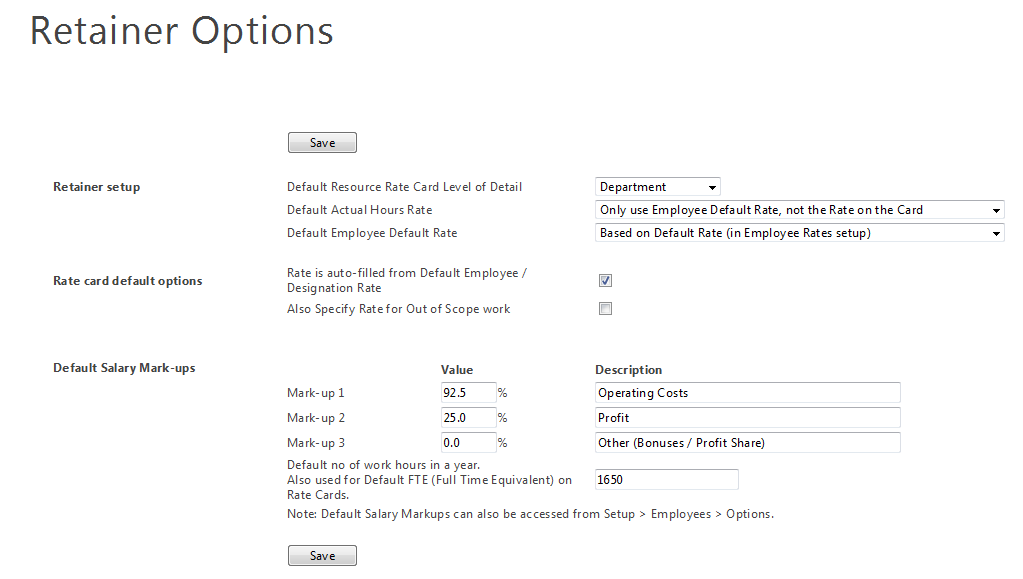
Select the 'Rate Card Level of Detail' choice.
| Choice | Description |
|---|---|
| No Detail | It is possible to setup a retainer quickly without specifying a rate card. Simply fill in the total budget and total hours (the next two fields) for the total duration of the retainer. Most retainer reports will immediately be able to show the plan vs actual hours and fees. However the breakdown of planned hours into department, designation or employee cannot be shown in reports unless specified on the rate card. |
| Department | Most retainer reports include a comparison of the plan to actuals by department. This option allows the plan to be input by department from the 'Setup Resource Rate Card...' button. We recommend this option to setup a retainer easily while allowing the breakdown by department to be shown. |
| Designation (Job Title) | Allows hours and rates to be specified by Designation. This is necessary where rates for actual hours must be the same as those on the rate card. It is important to finalise the list of Designations in Setup > Employee, Designations prior to setting up a rate card with designations. Reports showing the breakdown by department and designation will work correctly. |
| Named Employee | Allows hours and rates to be specified for specific employees or designations. Often retainer contracts specify hours for specific employees. This level of detail is sometimes required for fee recons reports. It takes more time to setup a rate card with this level of detail. In general it is easier and preferable to setup a rate card at department or designation level, where possible. |
Note: This choice mainly applies to rate cards that have been setup with Designation / Employee level of detail. The choice is mostly about which rate to use when the employee or employee designation cannot be found on the rate card.
| Actual hours rate | Description |
|---|---|
| Find Rate on Card, else Rate is Zero when not found | Timesheet actual hours will have a rate value of zero if the employee or employee's designation cannot be found on the rate card. This is useful for spotting unplanned resources that need to be added to the rate card at the correct rate. This choice is not advised unless the retainer reports are monitored carefully for staff with zero rates. |
| Find Rate on Card, else use Default Employee Rate | Default employee hourly rates will be used if no hourly rate can be found on the rate card for the employee's name or designation. This is generally the best choice to ensure that a 'best guess' rate is used for staff that cannot be found on the rate card. |
| Only use Default Employee Rate, not the Rate on the Card | Ignore rates on rate card, and only use employee default hourly rate to calculate the value of the actual time on timesheets. |
Note: A rate can only be found for an employee based on their name or designation. Thus for 'No Detail' or Department level of detail retainers, the rate for actual hours will either be the employee default rate or the employee marked-up salary cost.
| Employee Default Rate | Description |
|---|---|
| Based on the Rate setup in "Employee Rates and Costs" | Use the employee hourly rate which is found under Setup -> Employees, Rates and Costs p.h. tab. |
| Based on the Marked-up Salary Cost of the Employee (see blow) | Calculate the rate as the Salary cost p/h x Mark-up percentages. For example, say a markup of 100% for overhead costs and 20% for profit were to apply, the rate would be calculated as: Salary cost * (1 + 100%) * (1 + 20%). |

This dashboard shows an interactive analysis of planned fees vs. actual fees per Retainer Client
Any of the Client Retainer reports compare the retainer plan to actuals.
The defaults for new retainer plans can be setup by going to Setup -> Retainers, Options tab.